(1.5 hours, 30 hours total)
I installed the fuel tank today. Nothing too exciting, though it was yet another part that I got to hit with a hammer. This time, the hammer was to straighten out some bent edges that were preventing a good fit.
The return fuel line is now fully connected. The supply line is not properly clipped to the fuel filter. I think I need new clips, and I definitely need a new fuel filter.
I couldn't bring myself to spend time cleaning and painting a fuel tank that is going to be completely hidden from view in the finished car. A lot of Cobra builders seem to paint everything, and I certainly did paint my rear end, spindle adapters, etc. But the fuel tank? That's just going too far.
Wednesday, September 20, 2006
Friday, September 15, 2006
Rolling
(3 hours Wednesday/Thursday, 28.5 hours total.)

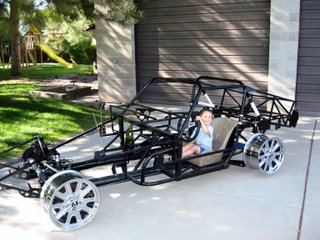
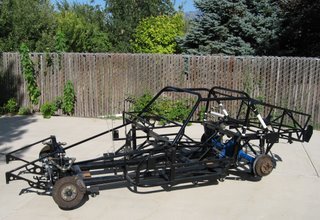
She's a roller. Not much real progress, but I got the rear LCA bolts replaced, put the spindles back on, connected the tie rods, and put the wheels on. I spent over an hour just replacing one little bolt on the forward arm of the upper arm bracket of the 3-link. It did not want to line up. I finally made myself a custom alignment tool out of a second bolt. I cut the head off, and tapered one end with a grinder. One day I hope to install some part of the car without using a hammer.

She's a roller. Not much real progress, but I got the rear LCA bolts replaced, put the spindles back on, connected the tie rods, and put the wheels on. I spent over an hour just replacing one little bolt on the forward arm of the upper arm bracket of the 3-link. It did not want to line up. I finally made myself a custom alignment tool out of a second bolt. I cut the head off, and tapered one end with a grinder. One day I hope to install some part of the car without using a hammer.
Tuesday, September 12, 2006
Spindles and studs
In my last post, I mentioned the bump steer studs that were left in the spindles. I now feel certain that the reason he left these in is that he couldn't get them out.
Well, they're out. Or more accurately, they're gone. Both were removed destructively. The first one was tough. I tried the standard technique of hitting the spindle with a big hammer and had no success. I then tried hanging a 5-gallon bucket of water from the stud (to get some tension on it) and hitting the spindle with a hammer, with no success. Then I drilled a 3/8" hole from the top clear through the tapered section, to release the pressure on the taper, and tried hitting it some more. No success. Finally I used a Dremel with a cutoff wheel to cut a groove in the stud just below the spindle. I stuck a chisel in the groove and hit it hard with a hammer, and the stud popped out.
On to the left side. Basic techniques again failed. I tried the drill and chisel technique that worked for the first one, with no success. I cut the bottom part of the stud off so I could get an impact socket on the hex section, and tried to break it loose with an impact wrench. The stud sheared off where I had cut the groove. (Note that it was hollow at this point from the drilling!)
With no way to pull on the stud, I started trying to figure out how to push on it. My big sledge (on a punch set in the hole) did nothing. I got a 12-ton hydraulic press from Harbor Freight and tried that, but the remaining portion of the stud above the spindle just crushed, since it was just a thin shell. So I drilled out the top of the stud to 1/2", matching the top part of the spindle hole, and drilling about half way through. Then I flipped it over and hollowed out the bottom part of the stud to just a thin shell of the taper, using a tungsten carbide cutter on a Dremel. Finally I put it back on the press, dropped a 1/2" bolt on top of the remaining portion of the stud, and pushed. Hard.
Sproing! Something popped, and everything moved. I looked around to figure out what happened. And there, on the floor, was a thin-shelled taper. Success! There was an odd odor, too. Not sure what that was about, but I definitely smelled something when it popped out.
The spindle is scratched up good and has a small divot at one edge of the taper hole, but nothing to worry about. Between the drill bits that I dulled, the Dremel cutter, and the hydraulic press, I spent more on this than it would have cost me to get a good used spindle. But I have wanted a press for other things, and the cutter is really good. Wish I hadn't messed up my 1/2" drill bit so much, though.
Monday, September 04, 2006
Suspension is done
(12 hours in 3 days, 25.5 hours total)
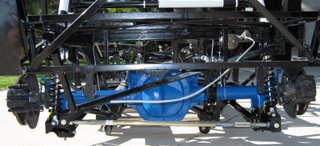
 The suspension is complete. The 3-link rear was interesting, because the FFR instructions are pretty poor. Fortunately, a lot of guys have put pictures of their builds online, so I was able to find some photos that helped me figure out where everything goes. I think everything is together, except that I'll need to swap out the rear lower control arm bolts.
FFR sent me the wrong bolts for the rear LCA. The donor bolts are 100mm, but that's not long enough for the rear brackets on the 3-link. So FFR includes 110mm bolts. Unfortunately, in my kit, what they included was 90mm bolts. Folks on the FFCobra forums complain that even 110mm isn't really enough, and you should use 120mm. Anyone ever try to find Class 10.9 120mm M12 bolts, in Utah, on a Sunday? Not gonna happen. So I just got a couple of 3/8" bolts to hold the arms in place while I completed the rest of the rear end, and I'll swap them for the correct bolts later.
I put the steering rack in, because I was thinking that it would be nice to have steerable wheels. But I found something troublesome. The SN95 spindles that I got with the Cobra brakes seem to have a bump-steer stud mounted. So I have to figure out either how to use it or how to get it out. Either one seems a little tricky right now. I suppose I'll consult the forums for some advice.
 The suspension is complete. The 3-link rear was interesting, because the FFR instructions are pretty poor. Fortunately, a lot of guys have put pictures of their builds online, so I was able to find some photos that helped me figure out where everything goes. I think everything is together, except that I'll need to swap out the rear lower control arm bolts.
FFR sent me the wrong bolts for the rear LCA. The donor bolts are 100mm, but that's not long enough for the rear brackets on the 3-link. So FFR includes 110mm bolts. Unfortunately, in my kit, what they included was 90mm bolts. Folks on the FFCobra forums complain that even 110mm isn't really enough, and you should use 120mm. Anyone ever try to find Class 10.9 120mm M12 bolts, in Utah, on a Sunday? Not gonna happen. So I just got a couple of 3/8" bolts to hold the arms in place while I completed the rest of the rear end, and I'll swap them for the correct bolts later.

I put the steering rack in, because I was thinking that it would be nice to have steerable wheels. But I found something troublesome. The SN95 spindles that I got with the Cobra brakes seem to have a bump-steer stud mounted. So I have to figure out either how to use it or how to get it out. Either one seems a little tricky right now. I suppose I'll consult the forums for some advice.

Subscribe to:
Posts (Atom)